2D Design V2 is well known and well used in Design and Technology departments nationally. However, it is seldom regarded as a natural choice for developing textiles work – until now.
Having worked with SpeedStep since its introduction as part of the D&T Association CAD in Schools program, I knew from training teachers and working with students that there was a need for software that could support designing and decision making within textiles education. Whilst Illustrator and Photoshop are still industry standards, they require an investment in time for both teachers and students to learn and there simply isn’t enough curriculum time for this to happen.
Back in 2011 when I was developing my Lantern project, I had started to dabble with 2D Design through my colleagues at Finham Park School, Coventry. They showed me how to create nets in 2D Design and send them directly to their laser cutter. At this stage though, I was only using the software to design the nets and cut them out of spunbond polyester (Vilene S80). However, it did prompt me to explore more fully the potential of 2D Design as I knew it was already in so many schools – so really it was simply a case of students transferring the skills they had learnt in other lessons over to textiles.
Around this time I started working with TechSoft, so thoroughly getting to grips with 2D Design became a necessity. It was a different way of working but I soon got used to being far more precise with my drawings and saw this as a real plus and obviously critical if I was to get good results when cutting out shapes. I soon became very impressed with how much was achievable within one piece of software.
From a textiles perspective 2D Design can be used as follows:
• Trace over a sketched image that is brought in as a background.
• Create ideas from scratch using a wide range of drawing icons.
• Design pattern repeats.
• Create colourways
• Use the layers to have different versions of the design e.g. added annotations, dimensions, colour.
• Produce technical drawings – to scale if required. e.g. lay plans or quarter sized pattern pieces.
• Output your designs to a wide variety of equipment for true CAD/CAM. Choose from laser cutter, knife cutter (plotter), sublimation printer, laser image printer, or export to embroidery machine software.
 Digital Fabric Printing
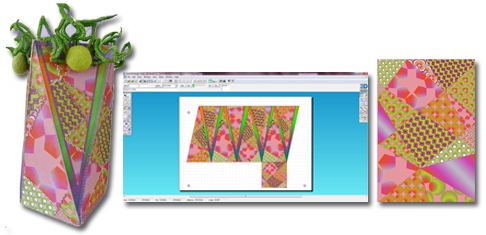
One of the most exciting parts of 2D Design is the opportunity to develop print designs, which when outputted to a sublimation printer affords complete ownership for students across all aspects of their work – from concept to colour choices and fabric design to end product. The Fill Settings window is the gateway to all kinds of wonderful combinations that can be tested in the preview area before applying to the design idea. The “Sochi container” was borne out of my appreciation of the graphics used for the Winter Olympics 2014 – the net was drawn first and then divided up into sections which were all filled using graduated fill options within the software. It was really quick and easy to do and a lot of fun.
Embroidery
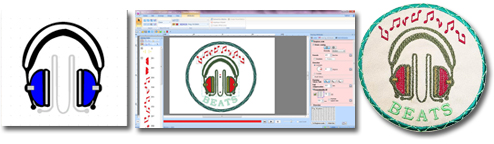
Once a motif or drawing has been created in 2D Design it can be easily exported as a bitmap into Brother PE Design software and turned into stitches using the Auto Punch feature. This is a great way of getting students to try out different techniques using the same creative starting point – the learning is in the technique or skill and doesn’t mean constantly re- drawing more ideas for each one. Once the design is in stitch form, there is scope to alter the type of stitches used and students can appreciate how today’s commercial embroidery is carried out, for example by looking at the number of stitches in a design or the time estimated to stitch it out. This in turn promotes an understanding of costing designs and working to a design specification. The final stitching on the Brother embroidery machine is very straightforward and produces an end result that students are proud of.
 Laser Cutting
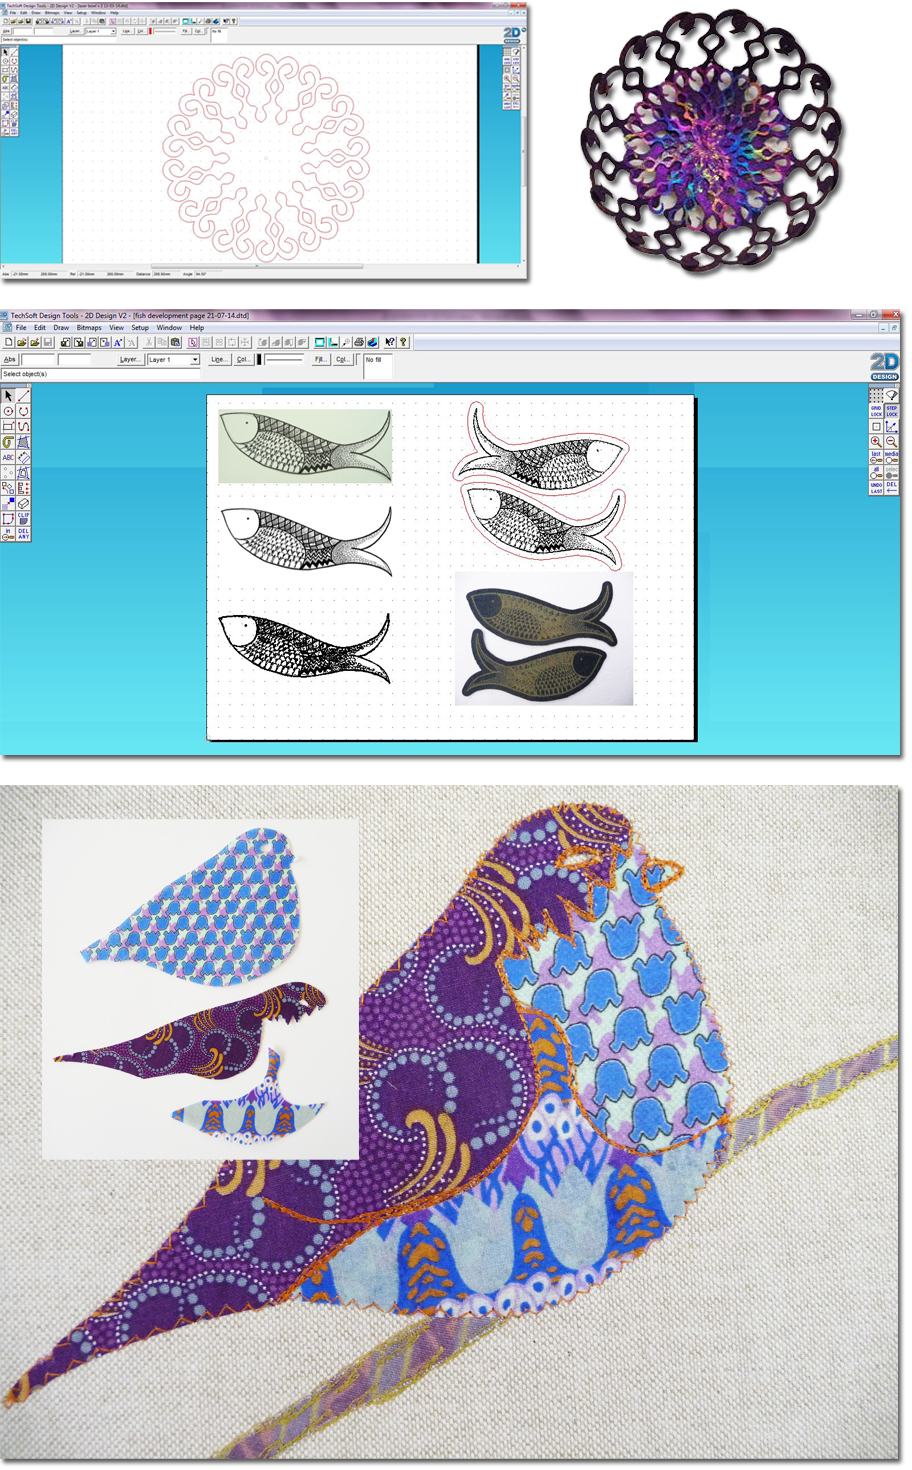
Again, using the same motif, it can be developed into an image suitable for sending directly to the laser cutter. This is usually done by using the very useful contour tool and it allows you to decide what order you wish the motif to be cut. For example, if the motif had sections within to be cut out, then they would be contoured first before the outer edge. This minimises the chance of the fabric moving if cut the other way around.
A single design can be trialled on a variety of different fabrics very quickly so that students can appreciate their distinctive properties and thereby make informed choices with regard to their own work.
The use of laser cutting for mark making in textiles is also a means of encouraging creativity with students work. Bring an image of a student’s drawing into 2D Design and by using the Bitmap menu, the image is converted to black and white. Next click on Vectorise Bitmap and the image is now ready to be sent to the laser cutter once the settings for power and speed have been completed in the print setup menu. It is a real bonus being able to output designs directly from 2D Design to the laser cutter.
Knife cutting
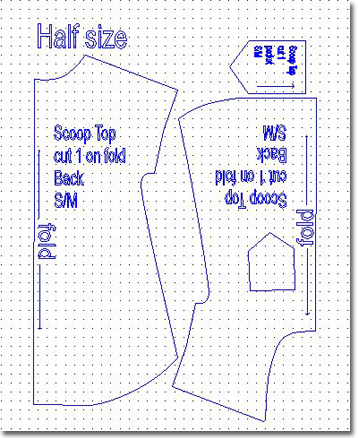
A knife cutter such as a CAMM 1 GX-24 machine is usually equated with cutting vinyl and card. However, by using 2D Design to create your shapes, designs can be output directly to the machine and cut quickly and efficiently. Fabric must be held firmly in place on a piece of sacrificial card in order to protect the machine’s cutting bed strip, otherwise the subsequent grooves would start to impede the quality of cutting for subsequent jobs. Use a low tack adhesive spray such as 505 Spray and Fix for fabrics - I spray a couple of pieces of card outside before the lesson so that they are ready to use when you need them. Position each job in a different area and the card will last for a considerable time. If you are cutting out shapes for applique work, then iron bondaweb on the back of the fabric first before placing it in the card. Shapes do need to be kept simple but you can cut lightweight fabric on a CAMM 1 GX-24.
Technical Drawing and Garment Pattern Development
Using 2D Design it is easy to build up technical drawings (flats) once you have grasped the basics of working with the drawing tools and editing options. Unlike SpeedStep, there isn’t a library of pre drawn garment components to work with but students should be encouraged to sketch their ideas and trace over them or bring in templates and draw over those to get started. This is where the “layers” option for 2D Design can be very useful. A template can be imported as layer one and the subsequent drawing over it is put on layer two. The third layer may have dimensions added and turned into a “flat”. A fourth layer may be coloured and have pattern fills added as a presentation sheet. Each layer can work on its own so selecting what needs to be printed off is easy.
An actual pattern piece could be drawn out roughly and then imported into 2D Design as a jpeg. By re drawing over the top of it, the accuracy can be improved and the required size can be achieved by rescaling it within the software. If the blade in the CAMM 1 GX-24 machine is swapped for a pen, then you have a plotter than can draw out your pattern pieces onto card or paper as required. Think about making up toiles at half or quarter size to check that they go together properly. This is perfect for showing development at GCSE or A-Level and you are going some way towards replicating industrial practice in the classroom.
From what was essentially thought of as a technical drawing package, 2D Design offers far more creativity than you think. It is perfect for integrating the D & T specialist areas as we head towards a more holistic approach to D&T as a subject. Schools can make better use of software which they may already have, but are currently under-using. Textiles teachers who are newer to 2D Design can find support from within the department and will no doubt be taught by their students in a two-way learning scenario.
Textiles specific 2D Design training courses will be held from October 2014. For details please go to www.techsoft.co.uk/training or for further information contact Heidi Ambrose-Brown: heidi@techsoft.co.uk.
by Heidi Ambrose-Brown of TechSoft, October 2014


")