Installation Instructions
Please follow the instructions below:
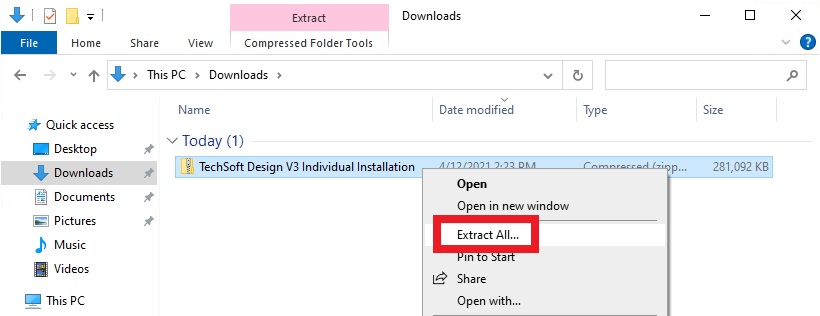
- Once the download has finished, you will have a "zipped" folder on your computer. This will typically be in your Downloads folder.
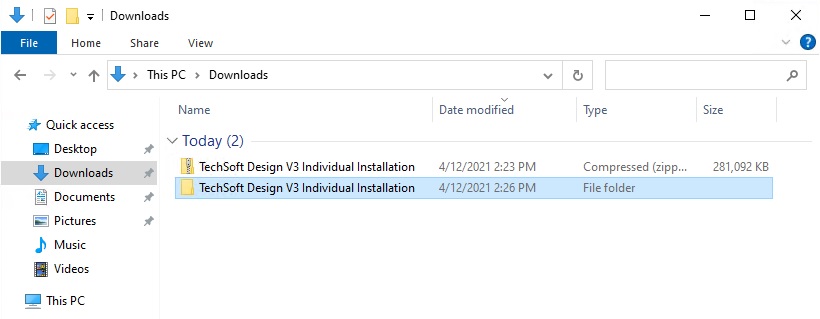
You now need to unzip this folder. In Windows 10 you can do this by right-clicking on the zipped folder and selecting "Extract All..." as shown below. Then follow the prompts to unzip the folder.

- Once unzipped, double click on the unzipped folder.

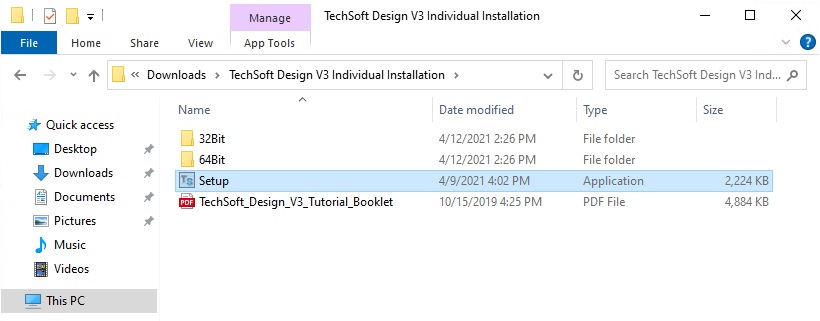
- Now double click on "Setup" to start the installation

- Follow the on screen prompts to install the software.
- Once installed, you can open the software by double clicking the program icon which you will find on your desktop (the program icon is shown below).

- You will now be prompted to enter your activation code if you have purchased the software.
If you have any difficulties, please do not hesitate to contact us at
support@techsoft.co.uk.
How to Get Started
A pdf file containing a number of software tutorials is included in the download. On installation this file may be accessed from the TechSoft Design V3 Tutorials icon on your desktop (you can see what the icon looks like below).

If you are unfamiliar with the software, working through these short tutorials is the quickest way of getting up to speed and is strongly recommended.
Notes for Network Managers
You can install the software using a command line. To do this:
1. Download the software and unzip it using the instructions above.
2. Within these unzipped files, go to the "64Bit" or "32Bit" folder as appropriate for your computers operating system.
3. Copy the software MSI file to a convenient place on your computer. The MSI file with be called either "x64_TechSoft_Design_V3_Individual.msi" (64-bit) or "x86_TechSoft_Design_V3_Individual.msi" (32-bit).
4. This software MSI file can be installed using the command lines as per the examples below:
Installation without Activation (you can activate when the software manually when it is first run)
msiexec.exe /i "PATH TO THE MSI FILE\x64_TechSoft_Design_V3_Network.msi"
Installation with Activation - fail if activation fails (enter your activation key - the installation will fail and rollback if activation fails)
msiexec.exe /i "PATH TO THE MSI FILE\x64_TechSoft_Design_V3_Network.msi" ACTIVATIONKEY="XXXXXXXXXXXXXXXXXXXX"
Installation with Activation - continue if activation fails (enter your activation key - the installation will continue if activation fails - you can activate the software manually when it is first run)
msiexec.exe /i "PATH TO THE MSI FILE\x64_TechSoft_Design_V3_Network.msi" ACTIVATIONKEY="XXXXXXXXXXXXXXXXXXXX" CONTINUEIFACTIVATIONFAILS=1
Silent Installation
Add the following commands to the end of either of the command lines above.
/quiet /qn /norestart
For example:
msiexec.exe /i "PATH TO THE MSI FILE\x64_TechSoft_Design_V3_Network.msi" /quiet /qn /norestart
In this section of our website you will find basic support articles for a range of TechSoft's software and machines. If you cannot find what you are looking for, please contact us on 01745 535007 or email us on sales@techsoft.co.uk


